 |
| Download the template here. http://smalldreamfactory.blogspot.com/2009/04/free-pattern-softie-whale.html |
 |
| I used a stash of Ikea fabrics. Love the blues and the greens. |
 |
| Trace along the template. Seam allowance have been given. |
 | |
| To make it easier, I cut off the seam allowance after tracing so that I can trace the actual body for easy sewing later. |
 |
| Cut the fabric on the seam outline. Don't forget to cut the flippers out as well. |
 |
| Pin the darts together. |
 |
| Sew the flippers and before inverting, snip on the edges. |
 |
| Invert the flippers. Don't they look adorable! |
 |
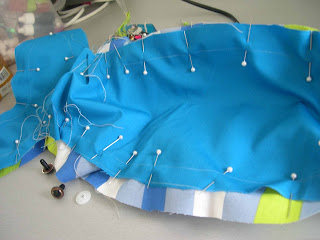
| Pin them as indicated on the template on the right side of the fabric. Thank God I used stripes, they kinda helped alot with the placing of the flippers. |
 |
| Sew around the body leaving the tail section open for inverting and stuffing. |
 |
| Snip all around so that when you invert, the curves will be smoother. |
 |
| The inverted whale. Now, Wally looked a little deflated. |
 |
| Mark and punch a tiny whole on the fabric where the eyes should be. Place the felt and eye ball piece and ... |
 |
| ...add the under cap of the eyeball in the underside. It should lock with a simple snap. This is to lock the eyeball in place, so little children will not be able to pull the whole eye out. |
 |
| Wally needs some fibre! |
 |
| Stuffing Wally was a breeze. Ladder stitch to close the opening. |
 |
| Tada! Wally is now Nigel's bedside companion! |


2 comments:
I love your son's whale!
:)
Hi there,
Love the whale. I want to make one but I'm unsure of how to put the fins on. Do they attach between the 2 pieces on the wrong side so that when you turn it right side out then they are there ? I Was hoping to see some pics of how you specifically attached fins as it's confusing without doing it .
Thanks !
Post a Comment