
 The Pressies! Every year I have a different theme for labelling my presents. This year I hunted around for everyone's photo and sort of 'Stamp' filter it on photoshop.
 This is for Auntie Josie!
 Some Close ups....Karen and Nick!
 My bro!
 Alistair, my bro's camera assistant.
 Melissa & Victoria.
 Auntie Dorcas & Ai-lin.
 My grandad and the usual suspects...Marina & Lucy. LOL!
 Our official camerawoman...Auntie Chris. Thank God for your steady hands, we'll be watching those videos for a long long long time! LOL!
 Kenneth taking some shots. Hey, who is taking who now?
 THE SPREAD! We had mom famed Kerabu salad, Sotong sambal, Popo's stewed pork dish, Kuihs and much more...
 Uncle David's specially marinated roast chicken.
 Mom! She lost her voice midway the party.
 Melissa...
 Joy...
 Justin...
 Alistair...
 Uncle Johnathan...
 The two love birds...
 Joel & Eirenne...
 Lyanne & Justin...
 Shen-ni & Jonathan...
 Tai Koo Poh...
 The Lims...
 Mom and me preparing for the annual contest. We gave out salt dough. I made them an hour ago (ouch! my hands hurt like crazy after al that frantic kneading!!!) I used Tempera paints for the colouring instead of food colouring.
 This year's theme was dancing penguins. Here's our teams...
 All on the floor, hard at work.
 Auntie Josie is supervisor!
 You'll never guess what's going on here..
 Look at the seriousness of it all.
 Stan and Nigel having a great time! No pressure guys!!
 Karen and Nick having a go at it... (You had a brilliant concept!!!)
 Alistair and Auntie Gin. She was really good at sculpturing the penguin. A handsome one it is!!
 Pastor Lawrence and Kung-Kung amused by the whole 'game' thing.
 My dad also participated...
 With the rest of the senior citizens! Very sporting group. They each contributed to the plate. LOL!
 Faith and Auntie Dorcas.
 What's up! Kenneth, Melissa and 2 alien penguins!
 Meow and Victoria! I must show you his bip bop presentation later.
 Guess who's the penguin?!!!
THEME : DANCING PENGUINS
 Faith's & Auntie Dorcas : Penguin Family
 Auntie Chris & Joy's : Penguin Wedding. (GRAND PRIZE WINNER)
 Alistair & Auntie Gin : Matrix Penguin
 Joel, Eirene & Ben's : Dance Fun
 A stranded penguin from Faith's and Auntie Dorcas' : Penguin Family.
 My dad's and Senior Citizen's : Let's Boogie
 Nigel and Stan's : King of Hula
 Meow's and Victoria's : Hip Hop Penguin
 Check out the beat box!
 We also have a life sized penguin! from Melissa and Uncle John : Phlash Dance! (Get it!)
 Kenneth and Melissa's : Penguins from Mars.
 We celebrated 2 birthdays with a giant cake by Auntie Josie.
 So pwetty!
 Uncle David having a big slice of cake! Yummy!
 Uncle Anthony auditing the results...
 This is what we call... 'Jumping for joy!'
 Last 2 winners

 4 Consolation prizes.
 We hid a coin inside one of the playdough as a surprise. Nicholas won the voucher and the consolation prize!
 Consolation Prize : Justin & Lyann : RM20 MPH Vouchers
 Consolation Prize : Uncle William and The Senior Citizens : RM20 MPH Vouchers
 6th Prize Winner : Nigel & Stan : RM25 Cash Prize!
 5th Prize Winner : Melissa & Uncle Johnathan : RM25 Cash Prize
 4th Prize Winner : Joel, Eirene & Ben : RM50 Cash Prize!
 3rd Prize winner : Shen-ni & Jonathan : RM100.00 Cash Prize!
 2nd Prize went to Mr. & Mrs Meow! RM200 Cash Prize
 Grand Prize winners : Joy and Auntie Chris!!! It's a RM500.00 Cash Prize man!!!!


Thanks guys for making it so fun this year. Can't wait for next year and this time we are doing something totally different!!! I think the group will be bigger this time, since most of our overseas relatives will make it for our annual celebrations. Also a BIG THANKS to our sponsor (who wish to remain anonymous) THANK YOU SO MUCH!!!! HUGS!!!!!
MERRY CHRISTMAS & HAPPY NEW YEAR FOLKS!!!!


 I drafted a template based on a photo of Francois and had it printed on a large sheet of cardstock.
 I looped 2 grossgrain ribbon to fit the loop on the brass latch and sew a small square piece of PVC leather on the base.
 Fold the PVC square and sew across to secure the ribbon. I love sewing on PVC, there's simply no fraying and it's quick because the stitches are larger than usual.
 I made a batch of these keychain latches and set aside.
 Cut the template. Cut PVC sandwiched pieces together and to secure the template onto the sandwiched PVC I simply used cellophane tape. Make sure the PVC is right side out on the both sides. There is no inverting for this little patch.
 Place a key latch into the middle of the template to measure.
 Now for the tricky part, I start by sewing around the template at the back of the neck of the dog...(I do this because I want to hide the knot which I'll make when I finish sewing around the dog with a simple ribbon bow.)
 The back of the neck is also where you'll sew and secure the key latch in between the 2 sandwiched PVC piece. You have to sew this in first and it'll secure the latch to the PVC pieces as you sew around. When sewing around, it's good to avoid sewing the card template, we're reusing this unless you want to cut many many templates for this.
 The finish sewing piece. I reused the template since it doesn't matter if it's torn after awhile, you only need the shape to keep you sewing neat. The first piece was the hardest, but as you go along you'll discover the stitches required to make a neat turn and so on.
 See the shape of the dog? Secure the stitching on both sides by tying at least 2 knots here.
 See what I mean? The knots will stop the thread from unravelling later.
 Cut neatly around your sewing, careful you don't cut the ribbon latch.
 Use a wee puncher for the eyes and voila!!!!

 Now for the tissue holders...I made a batch of this beforehand, they're easy peasy (you'll find a lot of tutorials on tissue holders) and in matching PVC and ribbon. Now to embellish these lovely tissue holders...
 I cut these little dogs one by one. Yes, I printed these template onto sticker paper (thanks Usha for the stickers!!!) The sticker template keeps the template secure onto the PVC as you cut around in detail.
 Punch a tiny hole with a needle for eyes and I used super glue to secure the dog to the edge of the tissue holder.
 I even gave the dog's ear a little fold. A dot of glue should secure the ears neatly. Aren't they all cute??? I didn't even have time to take pictures of the softies I made. Sorry for that, I wanted to but totally lost track of time as I had only less than a week to complete the whole entire set.
 This was a little crocheted coin pouch I made for Aqma from the Kosmo Newspaper. She did a write-up of my blog last month.

 For this laptop sleeve I used 6 balls of acryllic yarns (3 shades of pink x 2 sets). I wanted the sleeve thick so I combined the 3 shades of pink strands together. That's how you get the variegated shade.
 Your basic chain is very important. To measure the width of your base, you have to single chain 6 chain stitches shorter than the width of your laptop. That way, when you add the single crochet at the ends to build the rounds on your single chain, the fit will be just nice and snug.
 Close up of the round of single crochet on the last chain. Instead of the usual 6 single crochet on a chain to turn your stitches, I use only 4. This reduces the bulk on the end to create a slightly smaller base.
 Building your rows. Periodically test the fit by sliding your base onto your laptop to test the fit. If you find it loose, you may have to undo all your stitches and reduce the chains when you build the base again. I did that a few times, so remember the first rule : THE BASIC CHAIN HAS TO BE 6 CHAINS SHORTER THAN THE LAPTOP WIDTH!
 After creating the rows of single and nearing the end of the mouth of the sleeve I extended only one side of the sleeve to be folded over.
 Adding rows to the fold. Keep adding rows until you are able to cover the whole laptop and some over. Cut and secure yarn once you have the desired length.
 Start a row of Single crochet on the edges starting from one end of the cover to the other end.
 This is how the cover should look like before we slip stitch them together.
 Close up of the cover. Cut yarn and secure.
 IMPORTANT TIP : Invert the whole thing before you slip stitch the cover. This method will hide the edges on the inside and will eliminate pointed corners. (You can opt to handsew this part too.)
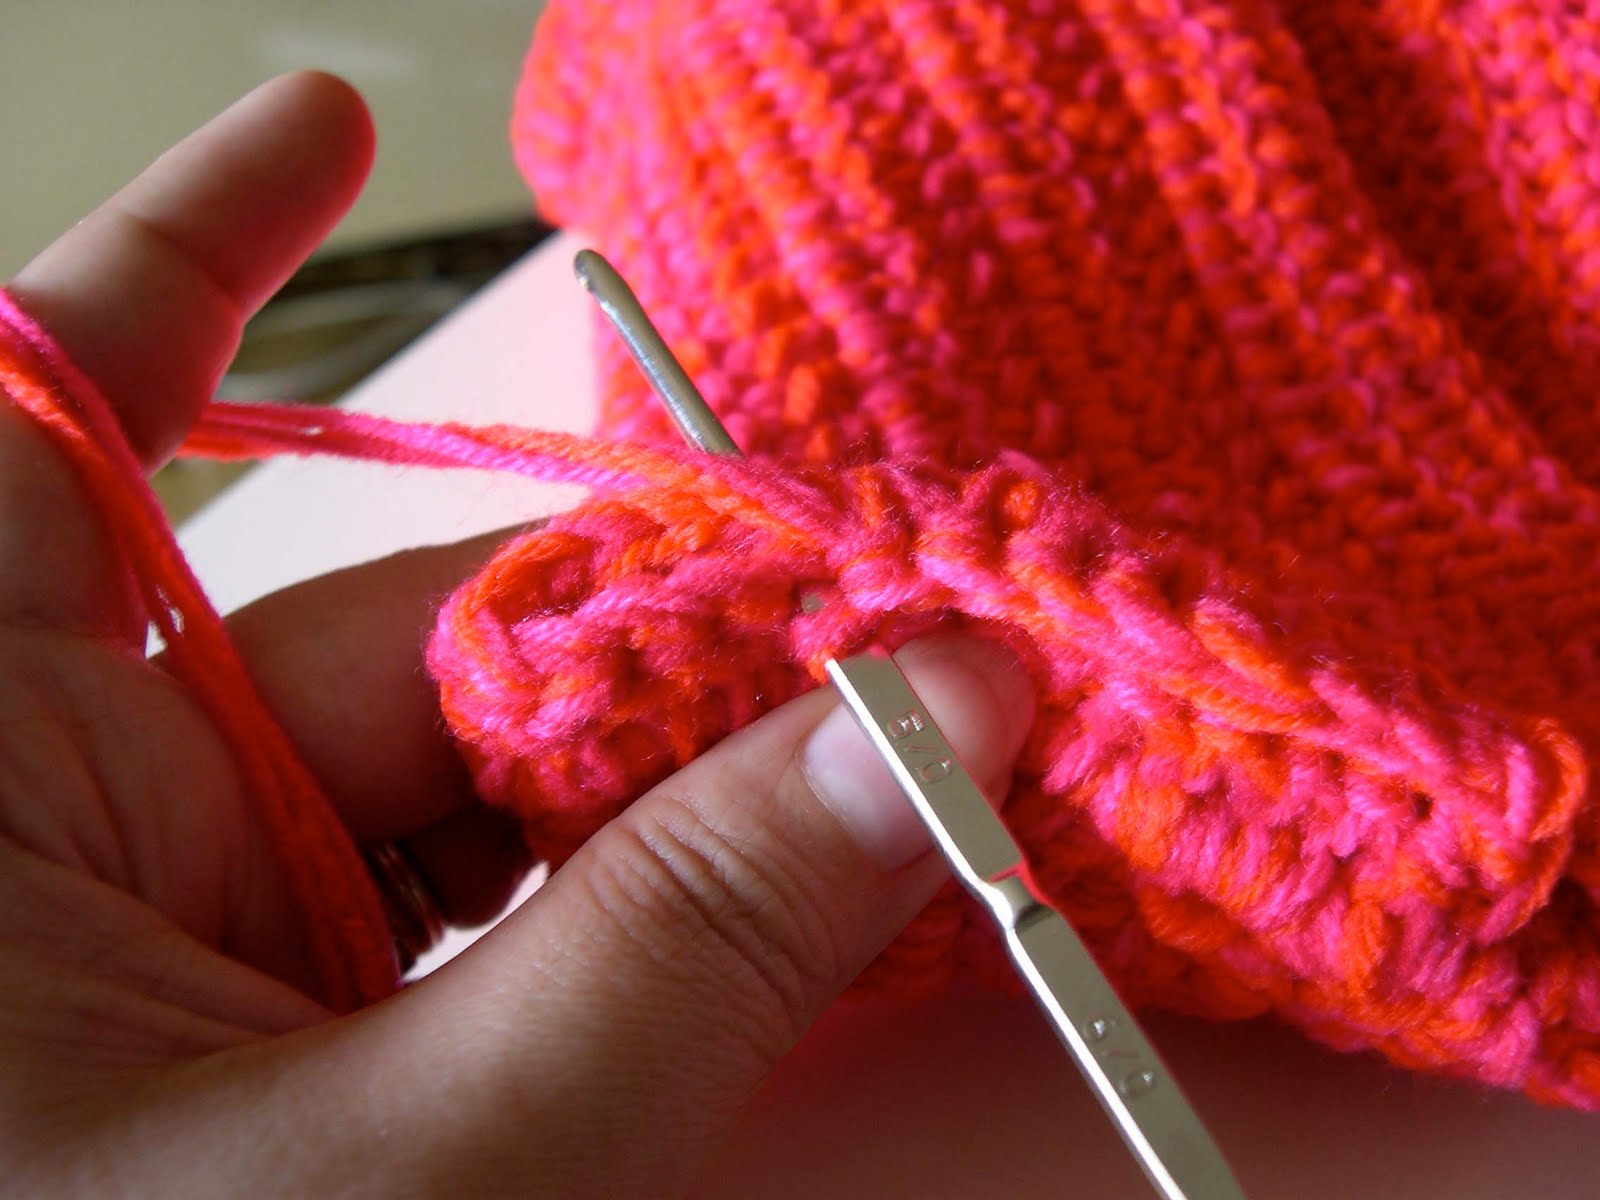 Close up of the slip stitch to secure the cover.
 Re-invert the sleeve cover and add desired buttons to secure the sides. Test the buttons to see if it can go through the gap created in your single crochet row.
 Ta-da! The completed sleeve. Now to embellish...
 See what I mean when you need to invert the sleeve to secure the cover. The corners are rounded instead of pointed.
 A zen-like quality. I thought stacking up these buttons was most relaxing.
 I tried a few combinations.
 Decided to use some felt flowers.
 Finally embellished!
 A peep inside. It's an easy peasy weekend project! Makes a great Christmas Pressie too!!