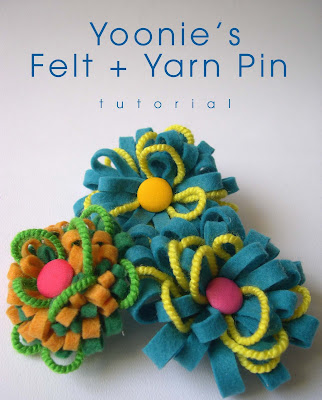
 I've made a lot of felt flower pins in the past 2 years (3 whole shoe boxes!). And I have added them to exchanges and sold them separately to crafters who are as obsessed with felt crafts too. Here's a simple and basic felt pin I love to make with leftover felt and yarn. They're fast to make and you can make all kinds of variations from this basic form. Have fun! And don't forget to leave a comment and send me some pictures!!!
 Here are things you'll need. You'd probably have all these things in your stash already. I've some leftover yarns from my crochet cupcakes and it's a waste if I don't use them. Felt, yarn, pin backing, your sharpest pair of scissors, buttons of sorts and good ole tube of UHU or any glue you use with felt. Glue guns work fine but you've to work quick! If not, the sewing on the glue will be quite impossible!!
 Cut a strip of felt around 4" thick (the thicker the bigger the flower) and 8" long in your favourite colour. I love this turqoise colour.
 Spread a line of glue as shown on one side of the felt piece.
 Fold down and lightly press.
 Don't wait for the glue to harden and snip strips on the folding. Not to thin, or your petals will just fall out. Not too thick, or your petals will be too lumpy. : )
 Spread another row of glue at the ends.
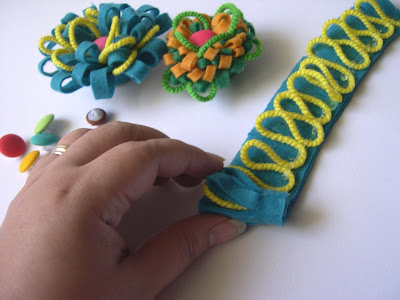
  With your leftover yarns (use any contrasting colours you like) line them as shown here. Start about an inch away from the left end (this ensures you have a space for your button). Making sure the yarn does not flow out to much on the top and keep the bottom neat.
 Snip off the end.
 Another thin row of glue on the top of the felt and yarn.
 Start rolling from 1" space at the end.
 Snugly and with your fingers try to tap the bottom lightly so that it is even.
 This is how the bottom looks like. Yarn should not be jutting out on this side.
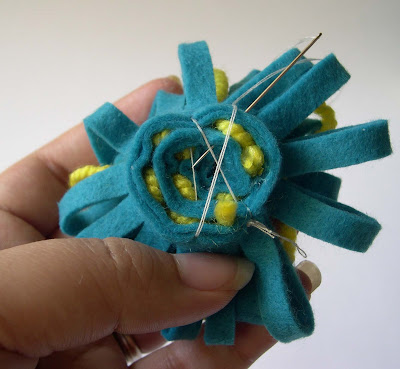
 To further secure your roll. Stitch a few lines here and there to secure the joining felt and yarn.
 Attach button of your choice with yarn or any thick embroidery thread.
 Cut a circular piece of felt that fits the bottom of your flower.
  Attach felt and pin backing with glue to the flower.
  And you might just end up with a stashful of these wonderful felt flowers like I did! Enjoy!!!

easy and lovely, nice for sharing it
ReplyDeleteMust go home and make one. Thanks Mel. :)
ReplyDeleteI must definately try it..A Very clear tutorial. Thanks Mel!
ReplyDeleteLovely, thanks Mel!!
ReplyDeleteThey're so easy Mel! Thank you!
ReplyDeleteWow! so colorful!
ReplyDeleteThey are so pretty and full of color. You are so crafty! :-)
ReplyDeletehiiii!
ReplyDeletethanks so much for your tutorial!!!
Very cute! Thank you for sharing!!
ReplyDeleteHi Mel! I have a surprise for you at my blog! Check it out!
ReplyDeleteBTW, thank you for thelovely tutorial!
Nik
mel.. i too giving you the award.. :)
ReplyDeleteits on my blog.. :)
Adorable flowers, thanks for sharing the tute!! I think J would love this.
ReplyDeleteso cute!
ReplyDeletewow...love it!
ReplyDeleteThat is THE COOLEST idea! I bet they might make cute bows too! I will have to find my felt and pick up some glue. Thanks!
ReplyDeleteLove it!
ReplyDeleteWow! You are a crafting genius!
ReplyDeleteThis is just about the cutest thing. I would never have guessed how you made them. Thanks for sharing.
ReplyDeleteThese are adorable!
ReplyDeleteVery nice! Thank you, I'm gonna try it!
ReplyDeleteSo nice....thank you !!!
ReplyDeleteAlice
it's so nice thank you ıwill trythis evening
ReplyDeletewonderful!
ReplyDeletesono bellissimi! li ho realizzati per attaccarli su di una sciarpa da regalare ;)
sono bellissimi! e facili da realizzare se perfino io ci sono riuscita ;)
ReplyDeletewah so simpleeee....... need to try this meh....
ReplyDeleteThanks for sharing with me as beginner:) keep up the good work.
ReplyDeleteJust found your blog! You inspire me! Thanks! -- running out the door to buy some felt---
ReplyDeleteHey thanks for this (and your other) tutorial! I just made one, so easy with your instructions. Lovely!
ReplyDeleteHi thanks for sharing your beautiful craft work. You are so talented and very creative too. I especially like all your felt crafts. May I know where you buy your felts in KL?
ReplyDeletenice, beautiful & lot of ideas..
ReplyDeleteThese are so cute, I am making them into clippies for the girls in my daughters preschool class for St. Patricks day. Thanks for taking the time to make and share the tutorial!
ReplyDeleteADORABLE!
ReplyDeleteQue lindo!!!
ReplyDeleteAgradecida pela good idea!
bjs
I stumbled across this tutorial today and featured it on my blog today featuring 3 dozen flower tutorials.. Here is the link:
ReplyDeletehttp://oopsey-daisy.blogspot.com/2010/04/wednesdays-wowzers-3-dozen-flower.html
Just discovered this tutorial. How cute. Can't wait to try it. Thanks so much for sharing. You are very good at making it crystal clear.
ReplyDeleteI found this tutorial today and featured it on my blog.
ReplyDeleteHugs from Brazil
Love it. Now I need to run ti Joann to pick up some felt. Thank you for idea
ReplyDeleteI just featured this tutorial on my blog, since I used it to make a part of my fabric flowers.
ReplyDeleteHere is the link:
http://faccioedisfo.blogspot.com/2010/09/voglia-di-fiorinonostante-lautunno.html
Many thanks!
Thanks for sharing!! =) These are so adorable
ReplyDeletewow it's beutyful...
ReplyDeleteRaffy.
love it you make it into different bright colors.
ReplyDeletethanks for the tutorial! blogspot.com/iwantthatmountain
ReplyDeleteSuch a cute idea. Great tutorial, too!
ReplyDeleteThose are really cute!
ReplyDeleteSo stinking cute! I bet my girls would love to make these. Thank you for sharing!!
ReplyDeleteThis is awesome. They would make great hair embellishment for this summer.
ReplyDeleteThank you for sharing. I loved the idea and will make some for me and gifts also. hugs from Brazil
ReplyDeleteThanks for sharing this tutorial. I have the supplies, just like you said, and will be making a pin today!
ReplyDeleteAmei essa ideia. Que linda flor.
ReplyDeleteObrigada por compartilhar. Um abraço